Full Calendar 란 ?
자바스크립트 기반의 오픈소스 라이브러리로 , 달력 , 스케줄러 등을 손쉽게 구현할 수 있도록
도와주는 라이브러리이다.
FullCalendar - JavaScript Event Calendar
Open Source... With over 10 years of open source and over 120 contributors, FullCalendar will always have a free and open source core. Learn more
fullcalendar.io
공식 Docs 사이트.
생각보다 알기 쉽게 자세히 작성해놓았기에 참고하면 될 듯 싶다.
|
1
2
3
4
5
6
7
8
9
10
11
12
13
14
15
16
17
18
19
20
21
22
23
24
25
26
27
28
29
30
31
32
33
34
35
36
37
38
39
40
41
42
43
44
45
|
document.addEventListener('DOMContentLoaded', function () {
$(function () {
var request = $.ajax({
url: "/full-calendar/calendar-admin", // 변경하기
method: "GET",
dataType: "json"
});
request.done(function (data) {
console.log(data); // log 로 데이터 찍어주기.
var calendarEl = document.getElementById('calendar');
var calendar = new FullCalendar.Calendar(calendarEl, {
initialDate: '2022-02-07',
initialView: 'timeGridWeek',
headerToolbar: {
left: 'prev,next today',
center: 'title',
right: 'dayGridMonth,timeGridWeek,timeGridDay,listWeek'
},
editable: true,
droppable: true, // this allows things to be dropped onto the calendar
drop: function (arg) {
// is the "remove after drop" checkbox checked?
if (document.getElementById('drop-remove').checked) {
// if so, remove the element from the "Draggable Events" list
arg.draggedEl.parentNode.removeChild(arg.draggedEl);
}
},
/**
* data 로 값이 넘어온다. log 값 전달.
*/
events: data
});
calendar.render();
});
request.fail(function( jqXHR, textStatus ) {
alert( "Request failed: " + textStatus );
});
});
});
|
cs |
DOM Content 가 로드 되면 , 다음과 같은 로직을 실행.
json GET 방식으로 데이터를 넘겨 받고 , URL 은 Full Calendar 가 존재하는 URL 로 설정.
데이터 값이 잘 넘어갔는지 로그를 찍어주었다. (운영 시점에 제거하기)
GET 방식으로 조회하면 'data' 로 값을 받아오고 ,
events: data 로 데이터를 뿌려준다.
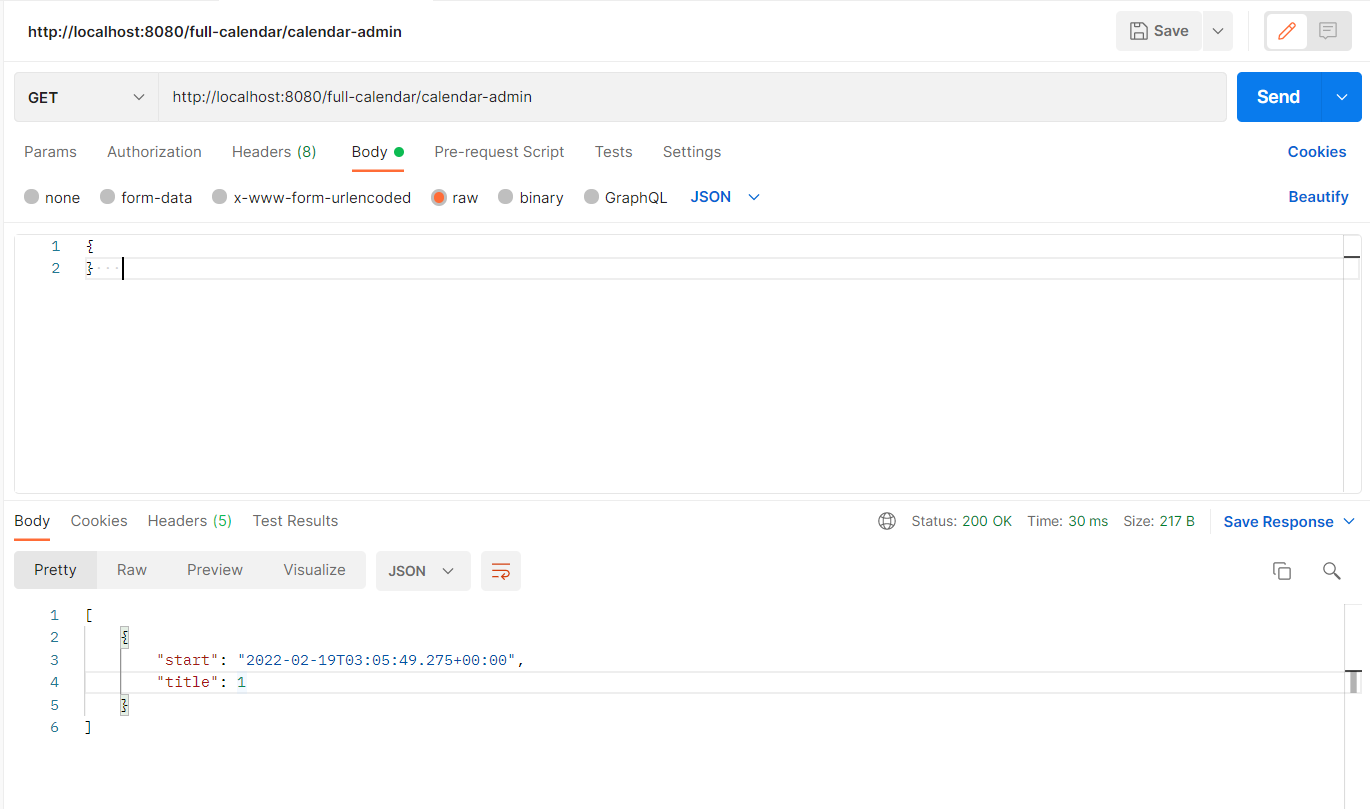
치환 된 data의 실제 값 ->
events: [
{
"title":"1"
"start":2021-07-08,
},
{
"title":"2"
"start":2022-2-19,
}
다음과 같은 방식으로 치환되게 된다.
CalendarController.class
|
1
2
3
4
5
6
7
8
9
10
11
12
13
14
15
16
17
18
19
20
21
22
23
24
25
26
27
28
29
30
31
32
|
@Controller
@RequiredArgsConstructor
@RequestMapping("/full-calendar")
public class CalendarController {
private static final Logger log = LoggerFactory.getLogger(CalendarController.class);
private final ScheduleService scheduleService;
@GetMapping("/calendar-admin")
@ResponseBody
public List<Map<String, Object>> monthPlan() {
List<Schedule> listAll = scheduleService.findAll();
JSONObject jsonObj = new JSONObject();
JSONArray jsonArr = new JSONArray();
HashMap<String, Object> hash = new HashMap<>();
for (int i = 0; i < listAll.size(); i++) {
hash.put("title", listAll.get(i).getId());
hash.put("start", listAll.get(i).getScheduleDate());
// hash.put("time", listAll.get(i).getScheduleTime());
jsonObj = new JSONObject(hash);
jsonArr.add(jsonObj);
}
log.info("jsonArrCheck: {}", jsonArr);
return jsonArr;
}
}
|
cs |
@RequestMapping 과 @GetMapping 으로 URL 주소를 설정해준 뒤 ,
Json 방식이기에 @ResponseBody 어노테이션 추가
scheduleService 의 값을 꺼내서 listAll 에 넣어두고 , hashMap 을 이용하여 그 안에 put 으로 값 설정.
Json 으로 변환하고 , 해당 값을 Json형식 Array 에 넣고 return 한다.
아래에서 jsonObj 를 hash 로 다시 형변환을 해준 이유는 다음과 같은 에러가 발생했기 때문이다.
Type safety: The method put(Object, Object) belongs to the raw type HashMap. References to generic type HashMap<K,V> should be parameterized
Type safety: The method add(Object) belongs to the raw type ArrayList. References to generic type ArrayList<E>
다음과 같이 직접적으로 Generic 타입 선언 없이 put으로만 일방적으로 넣었을때 경고가 발생한다.
hash 로 형 변환한 뒤 넣어주면 문제 없이 작동한다.
결과
Postman
Month

Week

day

list

임의로 Schedule Table 에서 값을 가져와서 대입하였는데 이름값도 가져와야하고 , start-end time 을 설정해야하기에
ERD 수정이 좀 필요할 것 같다는 생각이 들었다.
추후 수정해서 완성본으로 입력해놓자.
추가 수정
데이터는 정상적으로 가져와지는걸 확인했으니 , 여러 스케줄을 넣어보며 값을 설정해보려 했다.
우선 날짜와 시간을 설정해야 했기에 Date 로 설정돼있던 managerHopeDate 와
Integer 로 설정돼있던 start_time , end_time 을 이용하여 값을 설정하려 했으나 실패했다.
공식 Docs 에는 다음과 같은 기능 이외에도 추가적으로 더 많은 기능을 제공하고 있는데 내가 이용하고자 했던 것은
start, end , startTime ,endTime 부분이였다.

start , end 로 시작, 종료일을 정하고 startTime, endTime 으로 몇 시간 동안 할지 설정하자! 라는 생각을 갖고
적용해보았으나 결과는 해당 시간대의 모든 요일에 저장이 됐다.
즉 내가 2022-02-19 , 10 ~ 17 시 까지 설정을 한 경우 , 10 ~ 17 시 의 시간대가 모든 요일 (1 ~ 30 일) 에
저장된것이다.
무엇이 문젠가 싶어 순서도 바꾸어 보고 , DateFormat 도 변경해보고 했으나 적용되지 않았다.
※ 자료를 찾던 도중 , 내가 쓰고 있던 Date 타입은 Java8 이전의 타입으로 더이상은 쓰지 않는다 하여
현재는 LocalDate , LocalDateTime 등으로 변경하였다.
여러 번의 삽질을 한 뒤 , 다시 한번 문헌을 읽어보니 startTime 과 endTime 에 (For defining a simple recurring event)
구절을 확인하였다. 즉 , 반복적인 event 에 사용하는 파라미터였던 것이다.. 그렇기에 모든 날짜에 내가 추가한 일정이 생성된 것이였다.
stackoverflow 등 여러 질문들을 확인해봤지만 startTime 을 이용하여 특정 날짜만 설정할 수는 없는 것 같아서
다시 start 와 end 를 이용하기 위한 방법을 생각해봤다.
이를 이용하기 위해서는 LocalDateTime 을 이용해서 시작 시간대 & 끝나는 시간대를 받고 start , end 에
설정해주어야 한다고 생각했다.
현재 ManagerHopeTime.class 에서 아이디도 참조 가능하며 시간대를 설정하는 칼럼들이 있었기에 여기서 진행하였다.
|
1
2
3
4
5
6
7
8
9
|
@DateTimeFormat(pattern = "yyyy-MM-dd HH:mm")
@JsonFormat(pattern = "yyyy-MM-dd HH:mm", timezone = "GMT+9")
@Column(name = "manager_hope_date_start")
private LocalDateTime managerHopeDateStart;
@DateTimeFormat(pattern = "yyyy-MM-dd HH:mm")
@JsonFormat(pattern = "yyyy-MM-dd HH:mm", timezone = "GMT+9")
@Column(name = "manager_hope_date_end")
private LocalDateTime managerHopeDateEnd;
|
cs |
Table Entity 를 다음과 같이 변경하였다.
@DateTimeFormat 으로 시간과 분 까지 받도록 설정하고 , @JsonFormat 으로 timezone을 설정해주었다.
(TimeZone 기본 설정이 UTC 로 돼있기 때문에 9시간을 더해주어야 우리나라 시간에 맞는다.)
두 Format 의 차이는 다음과 같다.

변경 후에 , DB 에 값을 CREATE 한 결과는 다음과 같다.

CalendarController 에서는 다음과 같이 start 와 end 에 각각 값을 넣어주었다.

프로젝트를 Run 하게 되면 다음과 같이 정상적으로 출력됨을 확인하였다.
(1a 8p 는 처음에 무슨 오류지 했으나 1am , 8pm 을 의미하는 것이였다.)
Month

Week

Day

List

문제점은 background color 가 모두 동일하다는 점인데 , 원하는 색깔을 배열에 몇 개 담아두고
반복문으로 돌리면서 각각 다르게 출력해보아야 겠다.
오늘 적용한 부분에 대해서 팀원과 의논 필요!.. (ERD , LocalDateTime , background color)
FullCalendar 에 대해 더 알고싶다면 다음편!..
https://dodokong.tistory.com/44?category=1262083
FullCalendar 와 DB 연동하기 -2 (이벤트 생성)
FullCalendar 를 이용해서 스케줄 수정(생성) 을 하기 위해 다양한 자료를 찾아보았다. 기존의 FullCalendar 는 좌측의 메뉴에서 Drag&Drop 방식으로 이벤트를 생성하는 것이였는데 실용적인가 싶기도 하
dodokong.tistory.com
'Sketcher' 카테고리의 다른 글
| FullCalendar 와 DB 연동하기 -6 (코드 수정 & 매니저별 조회) (0) | 2022.03.07 |
|---|---|
| FullCalendar 와 DB 연동하기 -5 (조회, 수정, 삭제 Controller & Service) (2) | 2022.03.02 |
| FullCalendar 와 DB 연동하기 -4 (생성 Controller & Service) (0) | 2022.02.25 |
| FullCalendar 와 DB 연동하기 -3 (이벤트 수정 & 삭제) (0) | 2022.02.24 |
| FullCalendar 와 DB 연동하기 -2 (이벤트 생성) (1) | 2022.02.22 |


댓글