컴포넌트 스캔
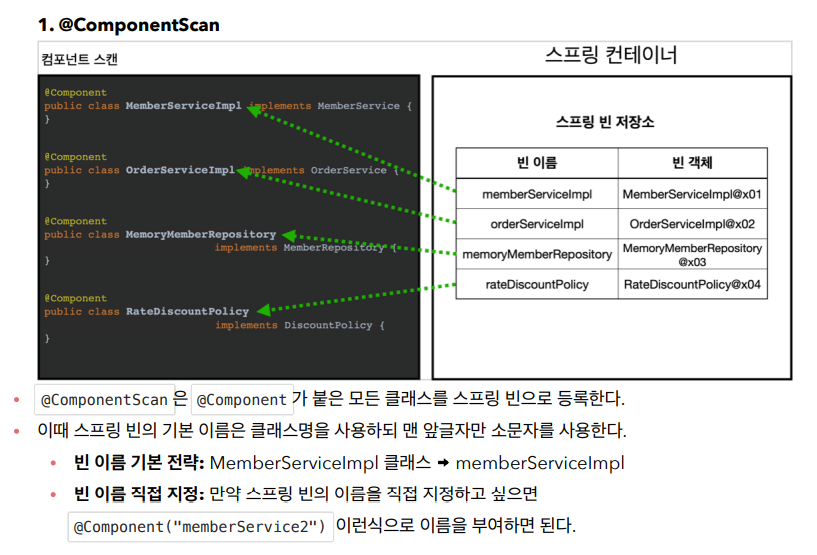
컴포넌트 스캔이란 @Component 어노테이션이 붙은 클래스를 스캔해서 @Bean 으로 등록해주는 것을 뜻한다.
이전의 AppConfig 에서는 @Configuration 으로 설정 클래스로 만들고 각 생성자마다 @Bean 어노테이션을 추가해서 직접 스프링 컨테이너에 넣었었다.
하지만 이는 서비스의 규모가 커지면 @Bean 을 수 없이 많이 적어줘야 하고 , 이는 여러모로 귀찮은 작업이 된다.
이를 위해서 @Component 스캔을 사용한다.
|
1
2
3
4
|
@Configuration
@ComponentScan
public class AutoAppConfig {
}
|
cs |
새로운 설정 클래스 AutoAppConfig 를 생성하고 @Configuration 과 @Component 스캔을 적용한다.
※ 참고로 @Configuration 도 @Component 를 상속받고 있다.
|
1
2
3
4
5
6
7
8
9
10
11
12
13
14
15
16
17
18
19
|
@Component
public class OrderServiceImpl implements OrderService{
private final MemberRepository memberRepository;
private final DiscountPolicy discountPolicy;
@Autowired
public OrderServiceImpl(MemberRepository memberRepository, DiscountPolicy discountPolicy) {
this.memberRepository = memberRepository;
this.discountPolicy = discountPolicy;
}
@Override
public Order createOrder(Long memberId, String itemName, int itemPrice) {
Member member = memberRepository.findById(memberId);
int discountPrice = discountPolicy.discount(member, itemPrice);
return new Order(memberId ,itemName, itemPrice , discountPrice);
}
}
|
cs |
스프링 빈을 사용하고자 하는 클래스에 @Component 어노테이션을 붙여준다.
@Autowired 를 사용하면 생성자에서 여러 의존관계도 한번에 주입이 가능하다.

※ AppConfig 같은 설정 정보는 .com.hello 같은 프로젝트 시작 루트에 두는 것을 원칙으로 한다.
컴포넌트 스캔의 대상
@Component 스캔의 대상에는
1. @Component : 컴포넌트 스캔에서 사용
2. @Controller : 스프링 MVC 컨트롤러에서 사용
3. @Service : 스프링 비즈니스 로직에서 사용 / 특별한 처리는 하지 않으나 비즈니스 계층이라고 인식
4. @Repository : 스프링 데이터 접근계층에서 사용
5. @Configuration : 스프링 설정 정보에서 사용 / 스프링 빈이 싱글톤을 유지하도록 처리를 한다.
※ 스프링 빈을 등록하는 방법에는 @Bean 처럼 수동으로 등록하는 방법과 @ComponentScan 을 이용하여 @Component 가 붙은 클래스를 자동으로 등록해주는 2가지 방법이 있다.
만약 두 빈의 이름이 똑같다면 자동과 수동 어느 쪽이 우선순위를 가질까 ?
정답은 수동 빈이 우선순위를 가진다. 하지만 이는 보통 개발자가 의도했다기 보다는 의도치 않은 오류인 경우가 많기에
Overriding bean definition for bean 'memoryMemberRepository' with a different definition: replacing
같은 오류를 출력해준다.
※ 의존관계 주입에는 수정자 주입 , 생성자 주입 , 필드 주입 , 일반 메소드 주입 이 있지만 생성자 주입을 택한다.
※ 생성자 주입시에는 private final MemberRepository memberRepository 처럼 final 키워드를 사용 가능하다.
이는 혹시라도 MemberRepository 에 값이 설정되지 않는 오류를 막아준다.
|
1
2
3
4
5
6
7
8
9
|
private final MemberRepository memberRepository;
private final DiscountPolicy discountPolicy;
@Autowired
public OrderServiceImpl(MemberRepository memberRepository, DiscountPolicy discountPolicy) {
this.memberRepository = memberRepository;
this.discountPolicy = discountPolicy;
}
|
cs |
생성자가 하나만 있는 경우 , @Autowired 어노테이션을 생략 가능하다.
|
1
2
3
4
5
6
7
8
9
10
11
12
13
14
15
16
17
|
@Component
@RequiredArgsConstructor
public class OrderServiceImpl implements OrderService{
private final MemberRepository memberRepository;
private final DiscountPolicy discountPolicy;
@Override
public Order createOrder(Long memberId, String itemName, int itemPrice) {
Member member = memberRepository.findById(memberId);
int discountPrice = discountPolicy.discount(member, itemPrice);
return new Order(memberId ,itemName, itemPrice , discountPrice);
}
}
|
cs |
※ @Autowired 어노테이션을 생략 가능할 뿐만 아니라 , Lombok 의 @RequiredArgsConstructor 를 사용하면 final 이 붙은 키워드를 모아서 생성자를 만들어준다.
-> 코드가 아주 간편해짐을 확인할 수 있다.
★결론 : 생성자를 딱 1개만 두고 (@Autowired 생략) Lombok 라이브러리의 @RequiredArgsConstructor 를 사용한다.
* 해당 글은 'Infleran'의 김영한 강사님의 자료를 참조하였습니다.
'Spring > Spring Framework(Basic)' 카테고리의 다른 글
| [Spring] Spring 을 이용하여 Service 구축하기 - 2 (0) | 2021.10.28 |
|---|---|
| [Spring] Spring 을 이용하여 Service 구축하기 - 1 (0) | 2021.10.28 |
| [Spring] 순수 자바 코드를 이용해 Service 구축하기 - 3 (0) | 2021.10.28 |
| [Spring] 순수 자바 코드를 이용해 Service 구축하기 - 2 (0) | 2021.10.27 |
| [Spring] 순수 자바 코드를 이용해 Service 구축하기 - 1 (0) | 2021.10.26 |


댓글